By now, you’re probably familiar with most of the adjustments on your machine – tension, stitch length & width, and stitch style. However, you may be forgetting one adjustment: the presser foot pressure (say that five times fast)!
What is Foot Pressure?
The presser foot is the part of the machine that holds the fabric securely while the machine sews and feeds it. Depending on the project you are making, you can change these feet – zipper feet, walking feet, and even guide feet are available for most machines. Pressure is adjustable on most, but not all sewing machines. The pressure on the foot makes sure that fabric does not slide or get stuck on the sewing surface.
Evaluating Foot Pressure
Sometimes, foot pressure problems can be hard to diagnose. There are typically two times you need to adjust the foot pressure:
- When fabric can move easily on the sewing surface, causing uneven stitch length and making it difficult to sew a straight line;
- When it is difficult to move the fabric while free-motion quilting because the foot is holding it in place.
In the case of the former problem, the foot pressure needs to be increased. In the case of the latter, the pressure needs to be reduced.
How Do I Adjust Foot Pressure?
Now that we’ve established why we adjust foot pressure, let’s learn how!
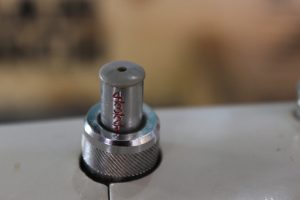
Pop Darner Pressure Adjusters
A Pop Darner is a specific style of pressure adjuster – it looks like the photo above. To use it, press the middle post down until you’ve reached the desired pressure level. Typically, they are marked with numbers. However, the markers can wear off or are sometimes not even provided. You can usually safely set the pop darner to 3-4, or 3/4 depressed.
To release pressure on a pop darner, press the outer ring down. Be careful, as the middle post will “pop” up rather quickly – hence the name.
Screw adjusters are in the same spot (on the top of the machine by the presser bar), but just tighten and loosen to adjust the pressure! The tighter the screw, the higher the pressure.
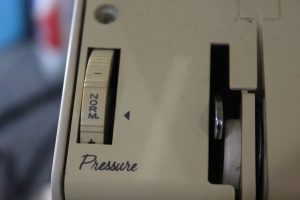
Dial Pressure Adjusters
Dial pressure adjusters are a little more intuitive – just move the dial like a tension to where you want it to be! These dials can be on the top/front of the machine (as pictured above), or on the left side cover. On rare occasions, they can be on the back of the machine above the presser bar lifter.
That’s it, folks! A fairly simple adjustment that can make a world of difference in your sewing!
Did I miss something? Have questions? Let me know in the comments or give us a call!
Sarah


Marlena Burger/Marlena says
Hi Sarah, I’m having problems with my brother Simplicity serger.
When sewing on silk for scarves, the presser foot is leaving a line all around the scarf about a half an inch inside the Hem.
I called I called my sewing studio and they told me to adjust the pressure foot put the knob is at the top of my machine. I adjusted it in small increments just about all the way to the beginning of work started and I’m still getting the faint line.
The lines are hard to detect in a photograph they’re very faint, but it is noticeable on my silk scarves.
Thank you
Sarah says
Hi Marlena, have you tried using a teflon foot? They’re meant to glide over fabrics much easier than a standard sewing foot. I’m not sure of the care instructions on your particular fabric, but using a steamer or washing them may take the lines out of your fabric as well. Thanks for your question!
Fiona Ann Roxburgh says
I have an old bernina 234 overlocker which works brilliantly but I managed to break to of the pressure feet that actually hold the fabric. Trying to find a replacement foot was hard but I did get one only to have imthis new one broke as well. I think it has to do with the wind up pressure knob on top of the machine it could have been screwed up or down since last time I used the machine. My question is would this break the actual foot ?? My second question is does anyone know of an alternate foot perhaps from a different machine that would fit the bernina 234 overlocker.,used or new I don’t mind please can anyone help me.
Sarah says
Hi Fiona, sorry to hear about your broken presser feet! Normally, the pressure put on the foot by the pressure adjustment isn’t enough to break the foot. Can you describe the part of the foot that broke? Sometimes sewing through really thick fabric, or having a bent needle can break the foot. I will say, however, that serger feet are normally very strong, so it would be odd for it to completely break. They can snap off of the presser foot shank, but are meant to do so and can therefore be snapped back on. Is it possible that this happened to your feet?
Jojo Sewist says
Thank you for the info. But do you mean depress the center of the pop darner to the 3 or 4? or Depress 3/4ths of center post, so only 1/4 of its length is visible? Sorry but I need to adjust the pop darner on a Kenmore 158.1941.2 and want to be sure I reposition it correctly. appreciate the help.
Sarah says
Hi Jojo,
Yes, if your pop darner is numbered, you can depress it to the number 3 or 4. You only want 1/4 (or a small amount) of the pop darner visible, it should be mostly pushed in. Hope this helps!
Angie says
Sarah, I have a sewing machine doesn’t have a presser foot tension adjuster, and it’s very difficult to move the fabric during sewing. What can I do?