I know, I know – that tension dial is a scary thing. It doesn’t have to be, I swear! Most sewers have no issue with adjusting the stitch type, length and width. However, that last dial (or button, if you have a computerized machine) is terrifying. Many refuse to touch it with a ten-foot pole. Today, we’re going to learn how the tension assembly works – and how to adjust it!
How Tension Works
Although there are many styles of tension assemblies, the way they work is the same across all machines. The tension assembly is necessary to add resistance to the top thread. This resistance is what ensures the stitches lock in place. Without a tension assembly, the top and bottom thread will not interlock correctly – which makes for a very weak, unattractive seam.
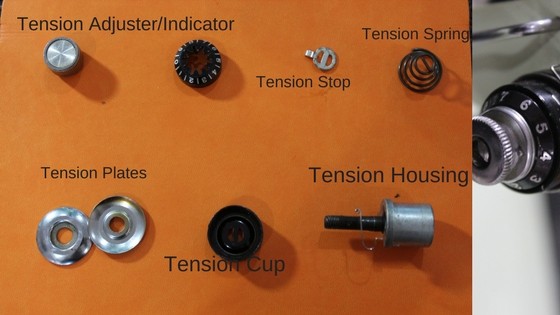
In most sewing machines, this resistance is controlled by a spring and two or three plates – called the tension plates. The thread goes in between these plates, and the spring pushes the plates together. As you tighten the tension, the spring presses harder against the plates, which makes it harder for the thread to pass through – creating the resistance we need.
In some new, computerized machines, these plates and springs are replaced with rollers. A computer board controls how close these rollers are to each other. The rollers move with the thread to keep the thread from tangling.
Anatomy of a Tension Assembly
I am going to quickly summarize the anatomy of the tension assembly, which may help you understand it further. I will start from the “back” of the tension assembly. Firstly, we have the housing of the tension assembly, which holds the rest of the pieces in the machine. There is usually a threaded post on the housing that the assembly is on. Many of the housings have a check spring embedded in them. The check spring is a small spring that the thread will pass through after going through the tension itself. This spring controls the slack on the thread to prevent large loops or knots from forming. The tension plates/discs are forward of the check spring, and are what the thread passes through. These push against the thread to determine the tension. The tension cup covers the plates and gives the tension spring a solid surface to press evenly against. The tension stop prevents the tension adjuster/indicator from passing the minimum or maximum tension setting. The tension adjuster and indicator are frequently one piece in newer machines, and push the spring down to set the tension.

This is a basic tension assembly. In some machines, the check spring is not part of the tension assembly itself, but is in between the tension and the take-up lever – normally not visible to the user.
How Does This Affect my Sewing?
The tension balance generally will not drastically affect the strength of the seams you are sewing. There are, of course, exceptions, but I will cover that a little later.
The biggest thing the tension affects is the appearance of your seams. Even with a low tension, there is still resistance on your top thread – which means the top and bottom thread will properly interlock with each other. However, where they interlock will change with your tension setting.
More resistance = a stronger pull.
When your sewing machine locks the top and bottom thread together, the two threads both pull away from each other. If the resistance on either side is uneven, you will not have a very attractive stitch. The easiest way to check your tensions is with two different colored threads.
Strong Top Thread Resistance
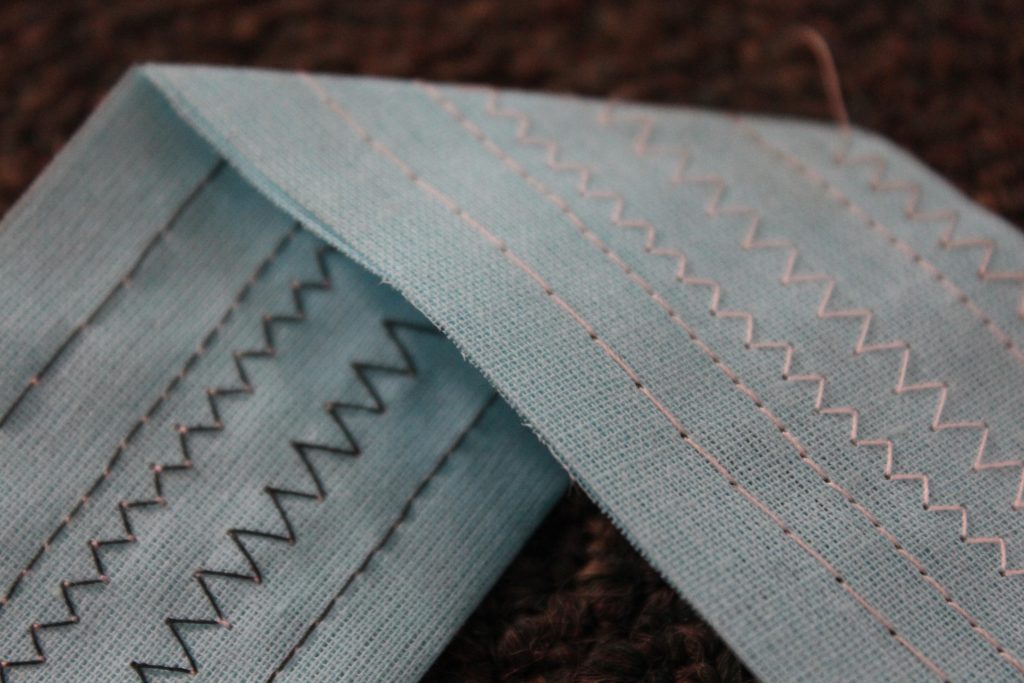
If the resistance of the top thread is stronger than the resistance of the bottom, you will see the bottom thread pulled to the top of the fabric. The top thread will not be visible at all from the bottom side of the fabric.
Strong Bottom Thread Resistance
If the resistance of the bottom thread is stronger than the resistance of the top, you will see the top thread pulled to the bottom side of the fabric. The bottom thread will not be visible at all from the top side of the fabric.
Equal Thread Resistance
If you have an equal amount of resistance on the top and bottom thread, you will barely be able to see the top thread on the bottom side of the fabric, and the bottom thread on the top side of the fabric.
The balance of tension is much more apparent when using decorative stitches or zigzag stitches.
Balancing the Top & Bottom Tensions

As I mentioned in the previous post, you should never have to adjust the bobbin tension. If you cannot balance the tensions using the top tension dial, there is something else going wrong with the machine.
The tension that your machine will require will differ based on the fabric you are sewing and the stitch you are using. The general goal is to have equal thread resistance, unless you are top stitching – in which case you would want the top tension slightly looser than the bottom.
Before starting your project, I strongly recommend cutting scrap from the fabric you intend to use. Use the same thread and stitch as you intend to use on your finished project, and sew a short test piece. Use this test piece to assess the tension balance of your machine. Generally, it is easiest to balance the tensions by starting with the tension dial at five.
On all sewing machines, a higher number means higher top thread resistance.
If the bottom thread is visible from the top of the fabric, but the top thread is not visible on the bottom of the fabric, turn the tension dial higher.
If the bottom thread is not visible from the top of the fabric, but the top thread is visible on the bottom of the fabric, turn the tension dial lower.
Now, it is important to note that everyone has a “sweet spot” for tensions. Some people absolutely cannot stand the bottom thread being visible on the top of the fabric. If you are one of these people, then by all means, set the top tension lower.
Tension Troubleshooting
On some occasions, having the incorrect tension can actually cause functional problems. This is rare, but I will go over it.
“Bumpy” Seams
The most common issue with an unbalanced tension is a bumpy seam. This occurs when one tension is drastically different than another. Remember – more resistance = a stronger pull. If you have bumps on the bottom of your fabric, tighten the top tension.
Stitches not Locking
If you get to the end of a seam and notice that it looks okay, but you can easily pull the top or bottom thread out, your stitches are not locking. This issue can occur alongside bumpy seams. Again, this can be solved by properly balancing the tensions. If the bottom thread can be easily pulled out, tighten the top tension.
“Bird Nesting”
If there are a lot of loops and knots on the bottom of your fabric, we say your machine is “bird nesting”. This can even cause the thread to break and your machine to get stuck. Typically, this issue stems from the thread not being properly in the top tension of your machine. Re-thread the machine from the beginning, ensuring the presser foot is up while you do so. If the issue persists, there may be a problem with your tension assembly.
“Catching”, or Intermittent Uneven Tension
Very slight tension inconsistencies are normal. If you notice that the thread tensions are usually normal, but sometimes appear very uneven (a little thread pulling every inch or so), you can try adjusting the tension slightly to offset it. For example, if you occasionally see the the top thread pulling to the bottom of the fabric, tighten the top tension slightly.
This problem, when severe, is normally caused by the thread getting caught somewhere. Check your spool and all the thread guides to make sure there is nothing that can pinch the thread or prevent it from being pulled off the spool. This catching can also be caused by improperly aligned adjustments of the machine, or a rough bobbin case. In these cases, it is best to get your machine looked at by a professional.
Rob. Meadows says
The best ‘how-it-works’ thread tension explanation and problem solving that I have found – Thanks!
Sarah says
Thanks for the feedback! I’m glad it helped you out.